Few computer-related disasters can drain the color from your face quicker than losing a document you’ve been busily working on. Whether your Mac crashed, froze, you forgot to save, or you accidentally clicked on delete, it can feel like an instant disaster. But, all might not be lost. We’ll show you how you can recover that vanished Word document.
In fact, if everything is working as it should, it’s quite hard to lose a file in Word. The software has an autosave feature that means that, in the event of an accident, you should still have the bulk of your work available, except anything you may have done in the last ten minutes before the file disappeared. Our top tip would be to save a document as soon as you start working on it to ensure that it autosaves regularly.
PROMOTION
EaseUS Data Recovery Wizard | Recover Unsaved Files

EaseUS Data Recovery Wizard simplifies the process of recovering unsaved Word documents, Excel sheets, PowerPoint presentations, and PDF files on Mac. By scanning your system, hard drive, momory card, USB and other storage media on Mac, it identifies files that have not been saved and presents a preview for you to review your recoverable files with ease. Now 25% OFF Exclusive Code: MACWORLD25.
But that’s not why you’re here. If you’ve opened Word and can’t find that document you were working on – don’t panic! There is a good chance that you can get your document back. In this article, we’ll run through the various ways you can recover an unsaved or deleted Word document.
How to recover an unsaved Word doc
We’ll run through a few likely scenarios you might be confronted with when trying to recover that Word document. As we said above, the good news is that Word for Mac has a built-in autosave feature called AutoRecover. This means that Word is quietly saving the document you are working on without you needing to manually tell the software to do so.
For this feature to function properly, you’ll need to initially save the document with a name and then Word will make incremental saves every ten minutes. However, even if you haven’t done this, Word will still save your document and you should be able to find a version of it in the AutoRecover folder.
Below we will run through how to get to the AutoRecover folder and some other steps you can take to recover your document.
Scenario 1: You are working on a Word document and you have to restart your Mac without a chance to save first
- Solution: Open Word again to see an autosaved version of your document.
The good news is that if you are using an up-to-date version of Word then just opening up Word again should recover the document—or at least a very recent version of it.
This is because Word autosaves your document – even if you haven’t saved it yet.
Quick Tip – How to turn on AutoSave
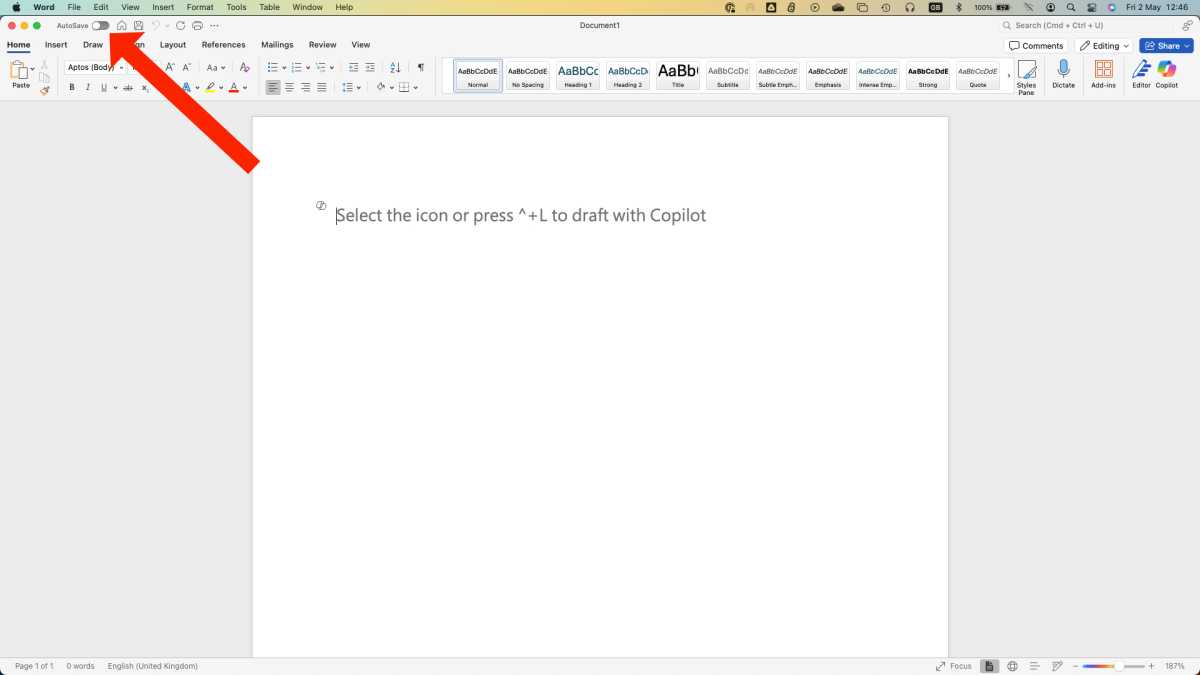
While Word will try to save every document in some form, it’s a good idea to set up the AutoSave feature manually as well. This only takes a second as you’ll find the AutoSave button displayed at the top of any window with an open Word document. It may default to the off position, so just click it to enable the feature and ensure that your work doesn’t suddenly disappear.
Martyn Casserly
Scenario 2: Opening Word doesn’t load up the document you were working on
- Solution: Find it in the AutoRecovery folder.
- Open the Finder.
- Click on Go in the menu.
- Click on Go To Folder.
- Paste in the following:
~/Library/Containers/com.microsoft.Word/Data/Library/Preferences/AutoRecovery - This will open your AutoRecovery folder where you will find the AutoRecovery versions of your documents even though you didn’t save them.

Martyn Casserly
Having found the document you may not be able to open it, in which case you may need to try the steps in the next scenario…
Scenario 3: Word won’t open the AutoRecovery version of your document
- Solution: Drag the file into a different text editor app
When you try to open the AutoRecovery file (either by clicking on it or trying to drag it onto the Word icon in the Dock) you may see a message claiming that Word experienced an error trying to open the file. One of the suggestions may be to open the Text Recovery Converter. Here’s what we did:
- Open TextEdit.
- Drag the file onto the TextEdit icon in the Dock.
- Copy the text into a new file in Word.

Martyn Casserly
Scenario 4: In a moment of madness you clicked on Don’t Save or Delete
- Solution: Find the most recent version in the AutoRecovery folder
The great news is that even if you didn’t save your Word document – even the best of us have clicked Don’t Save by accident when we were closing documents – you can recover it from the AutoRecovery folder, as we described in Scenario 2.
Luckily there is a simple way to view that folder. Just click to Finder and select Go > Go To Folder and paste the following:
~/Library/Containers/com.microsoft.Word/Data/Library/Preferences/AutoRecovery
This will open your AutoRecovery folder where you will find the AutoRecovery versions of your documents even though you didn’t save.
Scenario 5: You made a mistake and want to go back to an older version
Solution: Browser through recent versions
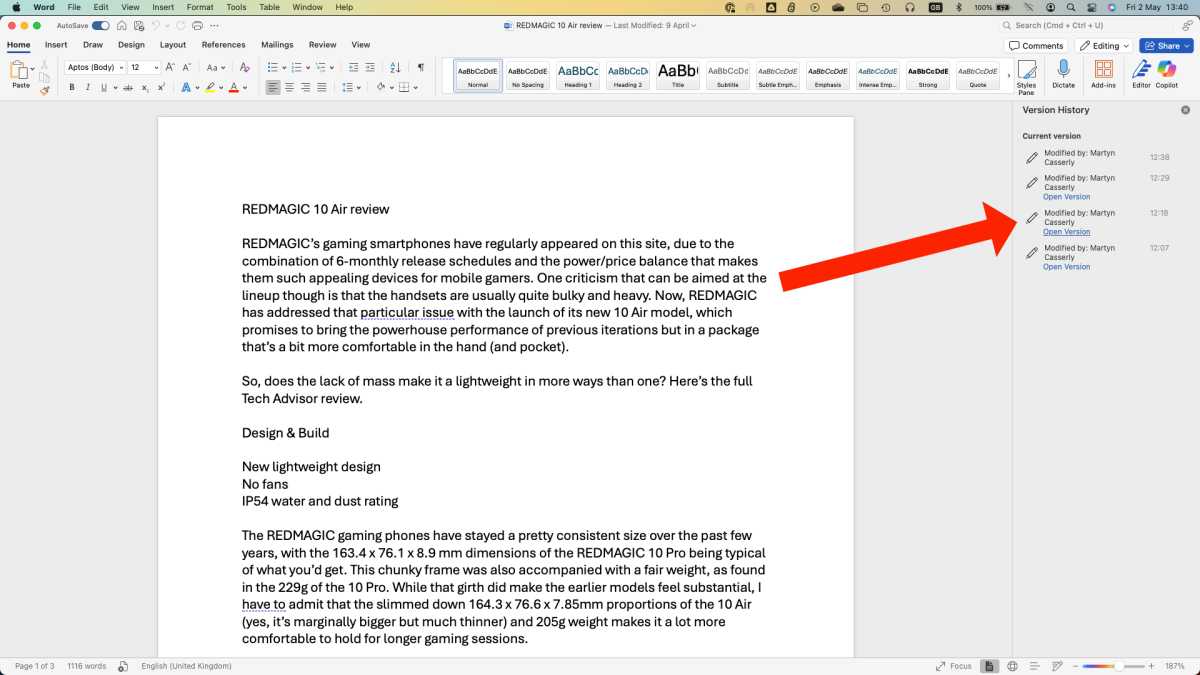
It’s not always the case that you lose the whole document. Sometimes you might lose some of the work you have done, which can be just as traumatic if you’ve spent a lot of time on it. As long as you have made an initial save of the document you should be able to browse the version history:
- With the Word document open click on File.
- Select Browse Version History.
- In the right-hand column, you’ll see the version history. Locate a version of the document from before you made the mistakes you wish to correct.
- Click on Open Version. This will open a second copy of your document.
- Either click on Restore (to go back to this version of the document) or Compare (if you don’t want to recover the whole document and just want to copy and paste the bit you need).
Screenshot
Martyn Casserly
Other ways to recover a lost Word document
If the above doesn’t work, or your version of Word is older than the current one, try the steps we outline below.
Check the Trash
In some cases, your file might be missing because you deleted it. It’s easily done when you are trying to make room on your Mac and you remove a load of old files only to realize that one of them was crucial. Luckily this isn’t as disastrous as it sounds. The document might still be found in the Trash.
- Click on the Trash can icon in the Dock to open it.
- You’ll now see the contents of the Trash. Look for your file. If you click on a file and press Space Bar you may be able to see a preview of it.
- If you don’t see your file look for a ‘Recovered Items’ folder in the Trash. It’s possible that your file is located in that.
- If it’s there you’ll need to right-click on it and choose Put Back. This will place the file back in the folder where it was originally saved and you can continue to work on it.
Recover old versions of documents via Time Machine
While Word has its own Version History that only works if you have saved the file at some point. Plus, if you have subsequently deleted the document by accident you can’t open it to open an older version.
In that case, you could try Time Machine.
If you have a Time Machine backup on an external drive you can roll back to a time when a deleted or corrupted file was still on your system.
- Go to the folder where you’d hope to see your file, or an earlier version of your file.
- Open Time machine and flick back through the day, weeks or months to see if your file is there. We’ll keep our fingers crossed for you.
- Follow our
Complete guide to Time Machine for instructions on how to recover your files.
If you are unfortunate enough not to have a backup routine then we suggest beginning one immediately. Macs are very reliable machines, but there is always a risk of something going wrong, so it’s best to protect yourself against potential disaster.
Try looking at our
How to back up a Mac feature that highlights several solutions for this essential practice.
What if you never saved your file – if in a moment of madness, you clicked on Don’t Save rather than Save? It happens! Can you retrieve your file?
Recover lost docs from the Temporary folder
Your Mac also has a folder where it might temporarily keep files. The Temporary folder isn’t easy to find though.
To find the Temporary folder, use Terminal (find it in Applications > Utilities > Terminal, or Spotlight search for Terminal by pressing Command + Space.
- Open Terminal
- Type: open $TMPDIR
- Press Enter.
Inside this TMP folder, you should find a folder called Temporaryitems. It’s possible that your document might be inside.
Use data recovery software
There are third-party apps that may be able to help you recover your document if the above advice doesn’t help. Check out our round up of the best data recovery apps for Mac. Our top choices include the following:
If you would rather not pay, there is a free version of EaseUS’s Recover Wizard for Mac that might be good enough for your needs.
How to find AutoRecovery in older versions of Word
Since you might not have the latest version of Word we’ll detail the steps below for you to follow to locate that Word AutoRecovery folder.
How to find the AutoRecovery folder in Word 2016
Here’s how to find AutoRecover in Word 2016:
- In Word 2016, the AutoRecovery folder is buried deep in the system and requires your Mac to display hidden files, so the first step is to reveal these secret folders, to do so we recommend following our advice at the link below, although the key combination to use is cmd + shift + . (full stop). Read: How to show hidden files and folders on a Mac.
- With this done you’ll need to open Finder then click on the Home icon in the left-hand column (it’s usually your name). Now navigate to the following folder:
Library/Containers/com.microsoft.Word/Data/Library/Preferences/AutoRecovery/
- If you have any AutoRecovery files then they will be in here. One thing to remember is that AutoRecovery files are temporary and only exist if they think that Word shut down unexpectedly. So, if you clicked Don’t Save rather than Save when you were closing the document there won’t be an AutoRecovery file for it.
How to find the AutoRecovery folder in Word 2011
If you are using Word 2011 it’s easy to locate the AutoRecovery folder:
- Click on the File option in the Menu bar then search for Autorecover.
- If you use Word often then there might be a few different Autorecover files, so check the date to see which one matches your missing item.
- Once you’ve found the document just click on it to open it up, then remember to save it again under a new name.
Even if you don’t find your document in the AutoRecovery folder, it may not be the case that it isn’t there. Files in the AutoRecover folder don’t always show up.
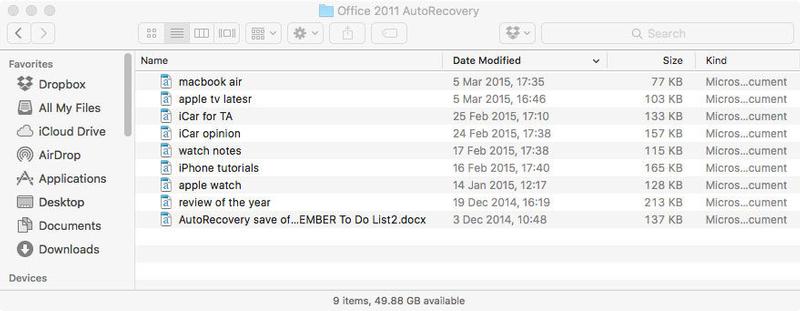
We have first-hand experience of this. In the past, our Mac has ‘helpfully’ saved a Word document in the Office 2011 AutoRecovery folder. This would not be an issue, except for the fact that when we then accessed the folder (just a quick search in Spotlight for Office 2011 AutoRecovery) the files were nowhere to be seen.
As you can see from this screen grab, the most recent file in our AutoRecovery folder was from 5 March, but we know that there are more recent files saved there.
The problem with the AutoRecovery file is that it is located in a Library folder that isn’t visible by default, and that will have some impact on whether your files are visible or not. Fortunately, there is a way to locate the file.
How to view files in Office 2011 AutoRecovery folder
- Go to the Finder, and press Alt (or Option) while selecting Go from the menu at the top of the page. This will make the Library folder visible (if you don’t press Alt you won’t see it – and you have to keep Alt pressed or it will vanish).
- Click on Library to open the Libray folder.
- Locate the following folder: Application Support > Microsoft > Office > Office 2011 AutoRecovery.
- When you see the Office 2011 in this view you should be able to locate your file.
Tips to avoid lost Word files
Avoid this nightmare happening again – follow the tips below.
Save first, save often
It goes without saying that you should save frequently especially if your Mac can be a bit unreliable.
You may be able to rely on Word autosaving for you, but remember that you have to save the file first to really benefit from Autosave.
Change the autosave frequency
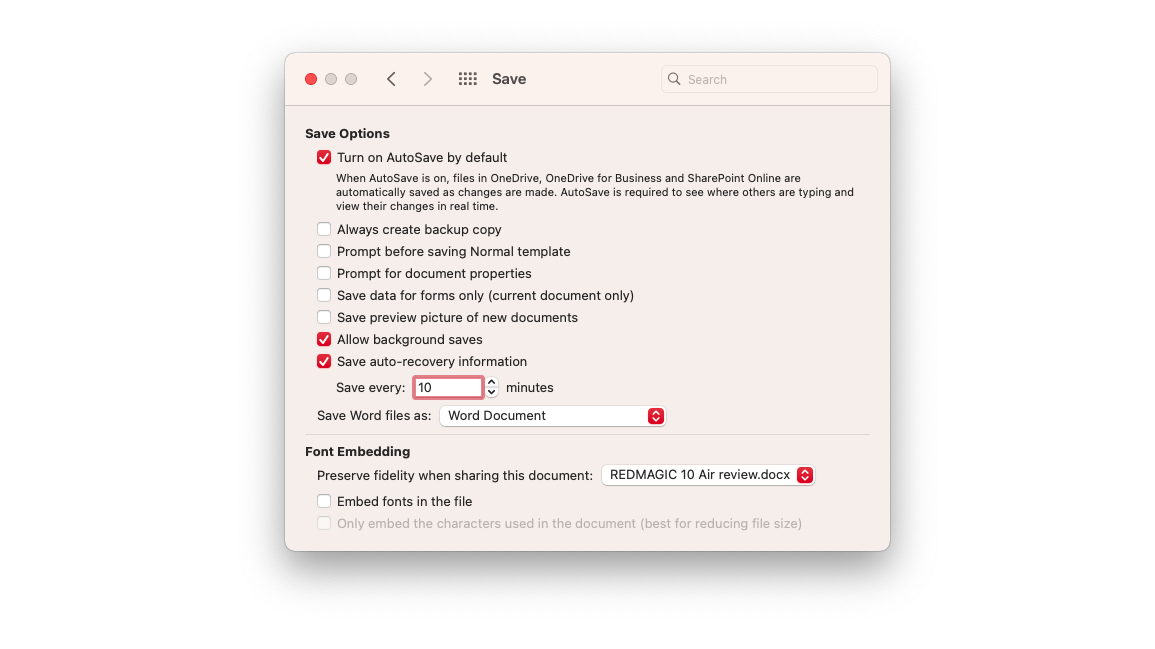
A helpful thing to know is that you can reduce the gaps between autosaves on Word for Mac. By default they are set at ten minute intervals, but it’s easy to make them more frequent.
In Word go up to the Menu bar at the top of the screen and click on Word. From the dropdown menu select Preferences and then in the Output and Sharing section you’ll see a disk icon named Save. Click this and you’ll now be able to adjust the time between saves by entering a value into the ‘Save every X minutes’ box at the bottom.
Martyn Casserly
While it might be tempting to set it as low as possible, bear in mind that Word’s performance could be be hampered slightly if it’s saving every minute, especially if you are working on a large file. Experiment to see what setting works best for you.
You may also find one of these articles helpful:
How to recover deleted files.
Want to get to know Word better? Read our
Top tips for Word for Mac.

