Your AirPods Pro 2 can now work as a hearing aid–here’s how

Macworld

With the iOS 18.1 release (and a corresponding AirPods firmware update), you can use your AirPods Pro 2 to take a “clinical-grade” hearing test, and then optionally use them as over-the-counter hearing aids or just adjust media playback to match your hearing loss.

It’s a fantastic new feature that we recommend everyone make use of. Hearing loss is far more common than most people realize, and even if you don’t suffer significant loss of hearing or don’t want to use your AirPods 2 as hearing aids.

What you’ll need

To run the hearing test and use your AirPods Pro 2 as hearing aids (or just adjust media playback to match your hearing profile) you’ll need three things:

  1. An iPhone running iOS 18.1 or later
  2. AirPods Pro 2 (either the Lightning or USB-C version)
  3. AirPods Pro 2 updated to firmware 7B19 or later

That last one might be tricky. There isn’t a way to force an upgrade to the new firmware, but it will automatically install when the AirPods are in their case and charging. However, it can take hours or even days to get the latest firmware.

To check your firmware version, open your AirPods Pro 2 case and then head to the Settings app on your iPhone, select your connected AirPods (near the top), scroll down past all the options to the About section, and look at the Version line. You can also find this information in General > About > [name of your AirPods].
Foundry

How to test your hearing with AirPods

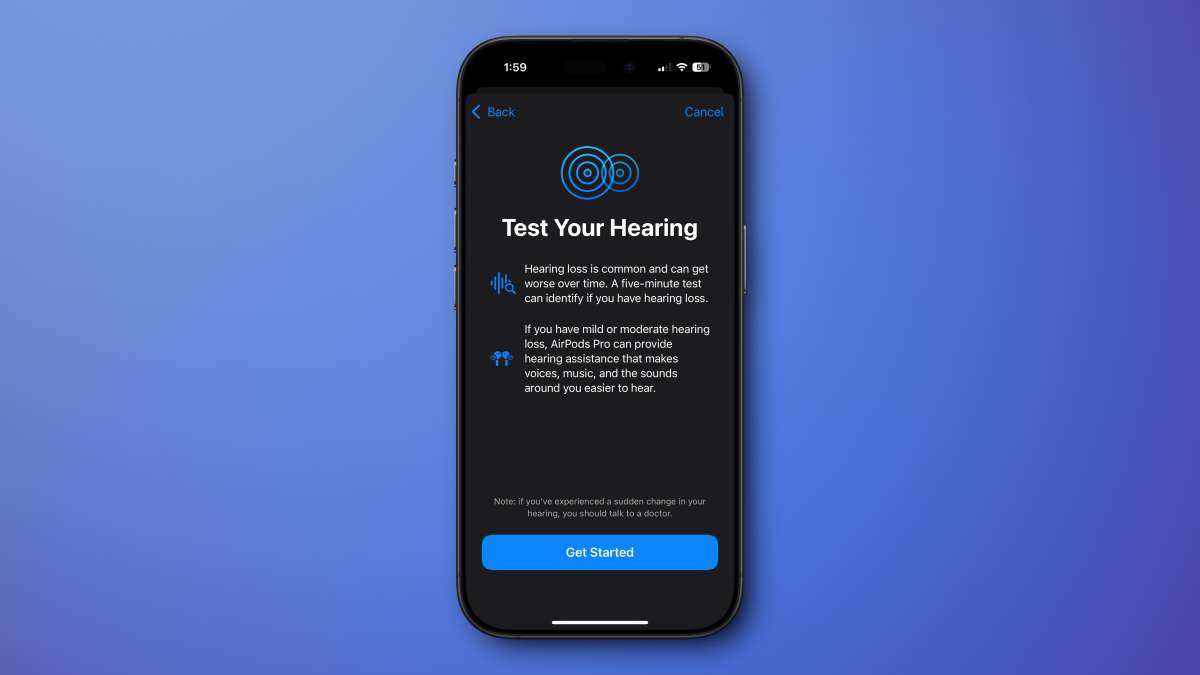
Start by putting your AirPods Pro 2 in your ears and then open Settings. Tap on your AirPods (near the top of the Settings page) and look for the Hearing Health section. You’ll see options for Hearing Protection, Hearing Assistance, and Take a Hearing Test. Tap that to get started.

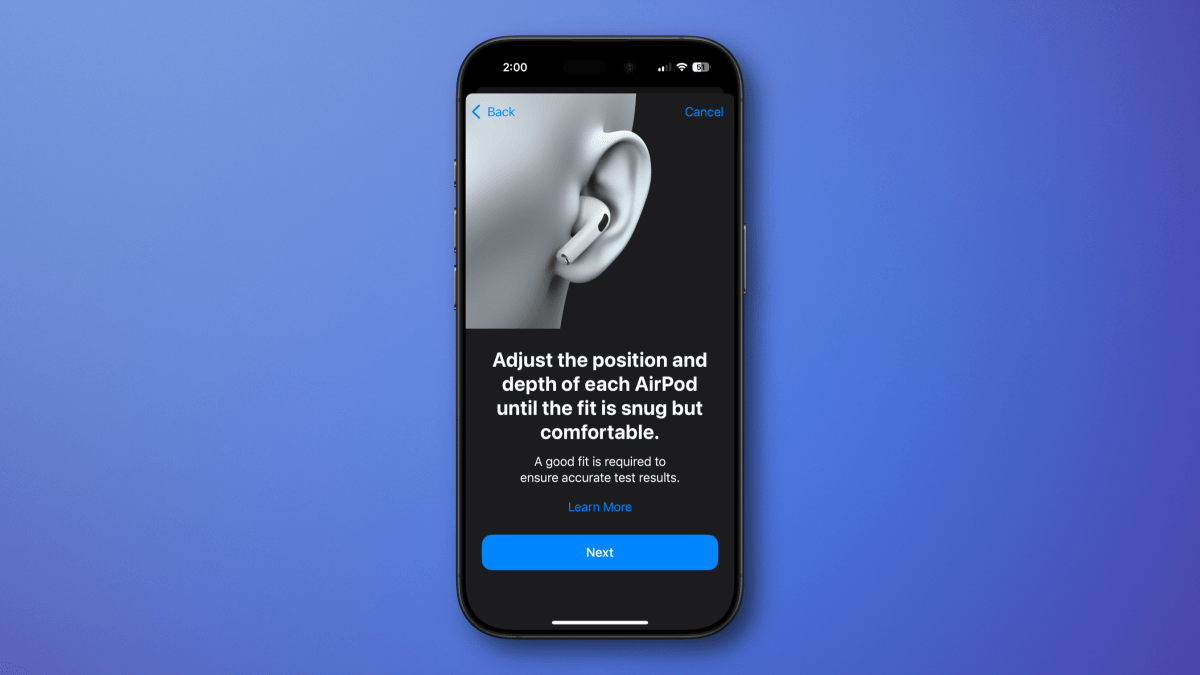
Before you begin, several screens will describe the process for you, and direct you to make sure your AirPods Pro 2 are secure in your ears with a good fit (it will run through the fit test to be sure). You’ll also want to be in a quiet environment to take the test.
Foundry

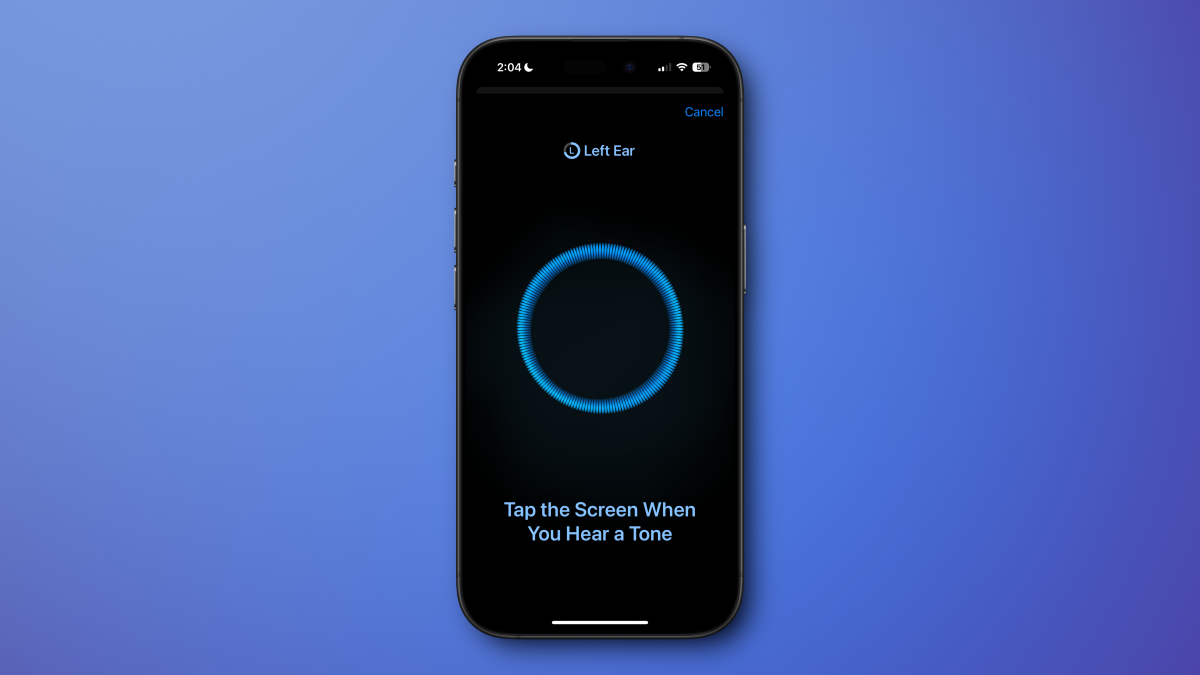
The test takes about five minutes. You’ll hear a series of tones at different intensities and frequencies, beeping three times each. Just tap the big moving circle in the middle of the screen when you hear a tone. Your left ear will be tested by itself, then your right ear.
Foundry

There will be times when you don’t hear anything at all for several seconds at a time. The tones are meant to play at different intervals so you can’t game the system by just tapping the screen every few seconds. Don’t be alarmed if 10 or so seconds go by without a sound, just take your time and don’t try to “win”—it’s not a game and there’s no high score, and trying to anticipate the tones and get a better result won’t do anything but make an inaccurate model of your hearing.

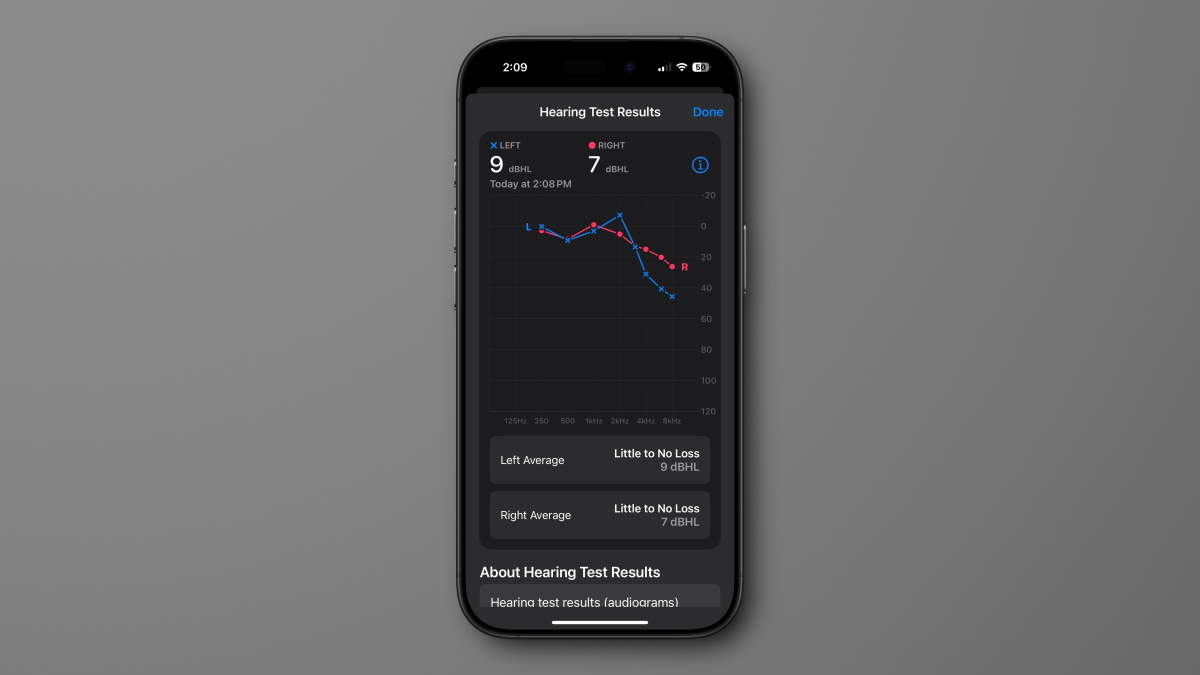
When it’s done, you’ll get a result that shows the hearing loss for your left and right ear across a wide frequency range. It is common to lose hearing in high frequencies as you age, but this test is most concerned with how much hearing loss you have in the spoken voice range between around 90 Hz and 300 Hz.

These results will be stored in the Health app where you’ll find them in the Hearing category.
Foundry

How to tune your Hearing options on AirPods

Once you have taken a hearing test, the Hearing Assistance menu will gain lots of options for you. Apple will suggest Hearing Aid be enabled only if you have mild-to-moderate hearing loss in the spoken word frequencies, but not if you are losing high-frequency hearing.

In a case such as mine, where my hearing is fine for speaking but is starting to fade in high frequencies, Apple will suggest enabling Media Assist. This will alter the volume of various frequencies across the entire spectrum to match your hearing results exactly, restoring the exact frequencies you may have trouble hearing individually for each ear. It’s active when playing back music, videos, making calls, or using FaceTime.

The difference can be dramatic! Start playing some music and then come back to this Settings menu to toggle Media Assist on and off to see what a difference it makes.

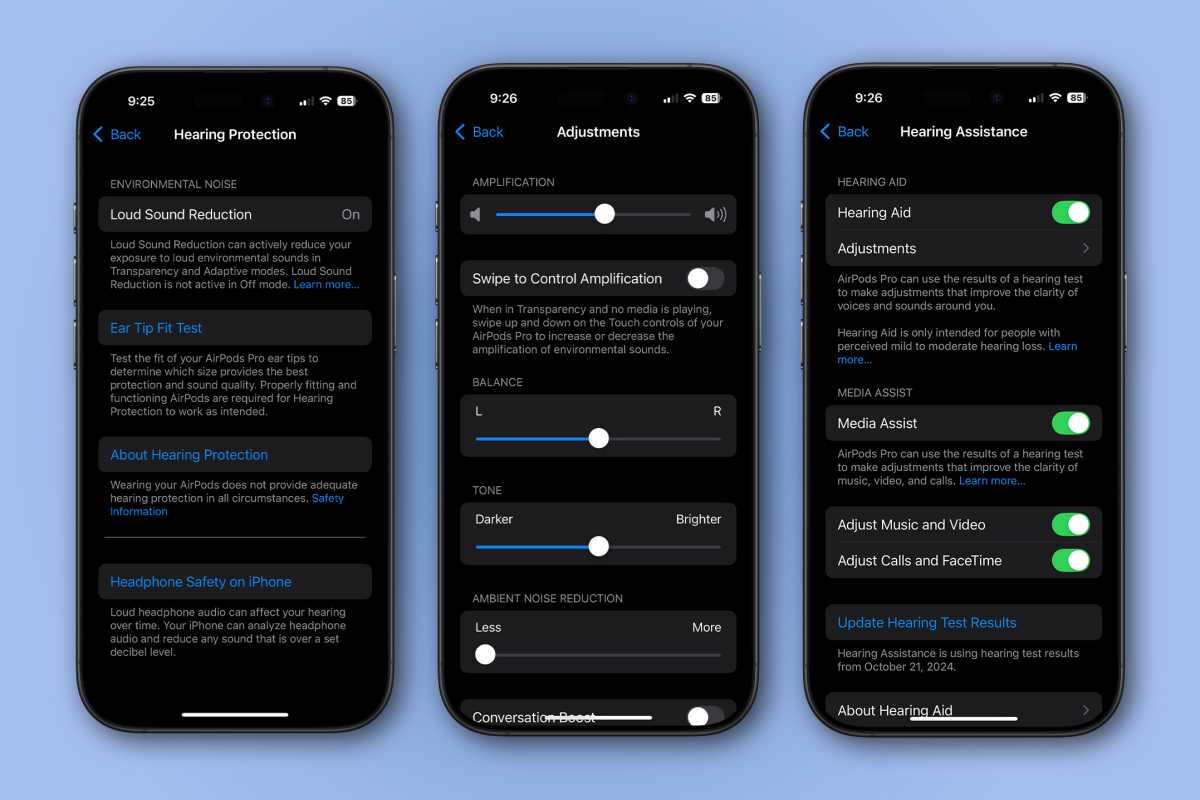
If you enable Hearing Aid, you’ll have some options to set in the Adjustments menu. You can change the level of sound amplification, adjust how much noise reduction to apply, enable conversation boost, and more.
Foundry

The Hearing Protection feature is enabled by default whenever you’re using Transparency, Adaptive, or Noise Cancelling modes. It reduces loud noises by 25-30 dB in Noise Cancelling or Adaptive Audio modes (losing a bit of efficacy for lower-volume sounds in Adaptive mode) and can shave off 11-18 dB for noises over 100 dB when in Transparency mode. It doesn’t handle very sudden loud noises like fireworks or gunfire, though, so be aware that it’s more about reducing sustained loud noises like a loud rock concert or motorcycle engine.

Leave a Comment

Your email address will not be published. Required fields are marked *

Your AirPods Pro 2 can now work as a hearing aid–here’s how

Macworld

With the iOS 18.1 release (and a corresponding AirPods firmware update), you can use your AirPods Pro 2 to take a “clinical-grade” hearing test, and then optionally use them as over-the-counter hearing aids or just adjust media playback to match your hearing loss.

It’s a fantastic new feature that we recommend everyone make use of. Hearing loss is far more common than most people realize, and even if you don’t suffer significant loss of hearing or don’t want to use your AirPods 2 as hearing aids.

What you’ll need

To run the hearing test and use your AirPods Pro 2 as hearing aids (or just adjust media playback to match your hearing profile) you’ll need three things:

  1. An iPhone running iOS 18.1 or later
  2. AirPods Pro 2 (either the Lightning or USB-C version)
  3. AirPods Pro 2 updated to firmware 7B19 or later

That last one might be tricky. There isn’t a way to force an upgrade to the new firmware, but it will automatically install when the AirPods are in their case and charging. However, it can take hours or even days to get the latest firmware.

To check your firmware version, open your AirPods Pro 2 case and then head to the Settings app on your iPhone, select your connected AirPods (near the top), scroll down past all the options to the About section, and look at the Version line. You can also find this information in General > About > [name of your AirPods].

Foundry

How to test your hearing with AirPods

Start by putting your AirPods Pro 2 in your ears and then open Settings. Tap on your AirPods (near the top of the Settings page) and look for the Hearing Health section. You’ll see options for Hearing Protection, Hearing Assistance, and Take a Hearing Test. Tap that to get started.

Before you begin, several screens will describe the process for you, and direct you to make sure your AirPods Pro 2 are secure in your ears with a good fit (it will run through the fit test to be sure). You’ll also want to be in a quiet environment to take the test.

Foundry

The test takes about five minutes. You’ll hear a series of tones at different intensities and frequencies, beeping three times each. Just tap the big moving circle in the middle of the screen when you hear a tone. Your left ear will be tested by itself, then your right ear.

Foundry

There will be times when you don’t hear anything at all for several seconds at a time. The tones are meant to play at different intervals so you can’t game the system by just tapping the screen every few seconds. Don’t be alarmed if 10 or so seconds go by without a sound, just take your time and don’t try to “win”—it’s not a game and there’s no high score, and trying to anticipate the tones and get a better result won’t do anything but make an inaccurate model of your hearing.

When it’s done, you’ll get a result that shows the hearing loss for your left and right ear across a wide frequency range. It is common to lose hearing in high frequencies as you age, but this test is most concerned with how much hearing loss you have in the spoken voice range between around 90 Hz and 300 Hz.

These results will be stored in the Health app where you’ll find them in the Hearing category.

Foundry

How to tune your Hearing options on AirPods

Once you have taken a hearing test, the Hearing Assistance menu will gain lots of options for you. Apple will suggest Hearing Aid be enabled only if you have mild-to-moderate hearing loss in the spoken word frequencies, but not if you are losing high-frequency hearing.

In a case such as mine, where my hearing is fine for speaking but is starting to fade in high frequencies, Apple will suggest enabling Media Assist. This will alter the volume of various frequencies across the entire spectrum to match your hearing results exactly, restoring the exact frequencies you may have trouble hearing individually for each ear. It’s active when playing back music, videos, making calls, or using FaceTime.

The difference can be dramatic! Start playing some music and then come back to this Settings menu to toggle Media Assist on and off to see what a difference it makes.

If you enable Hearing Aid, you’ll have some options to set in the Adjustments menu. You can change the level of sound amplification, adjust how much noise reduction to apply, enable conversation boost, and more.

Foundry

The Hearing Protection feature is enabled by default whenever you’re using Transparency, Adaptive, or Noise Cancelling modes. It reduces loud noises by 25-30 dB in Noise Cancelling or Adaptive Audio modes (losing a bit of efficacy for lower-volume sounds in Adaptive mode) and can shave off 11-18 dB for noises over 100 dB when in Transparency mode. It doesn’t handle very sudden loud noises like fireworks or gunfire, though, so be aware that it’s more about reducing sustained loud noises like a loud rock concert or motorcycle engine.

Leave a Comment

Your email address will not be published. Required fields are marked *

Scroll to Top
0